Cloud Native Java 따라하기 3(스프링 클라우드 설정 서버)
by Jeongjin Kim
스프링 클라우드 설정 서버로 중앙집중형 설정 사용하기
설정정보를 외부 파일로 분리해서 사용하는 방법을 앞선 포스트에서 했었는데 몇 가지 남은 문제점들이 있다.
- 애플리케이션의 설정 정보가 변경되면 애플리케이션을 재시작 해야한다.
- 어떤 설정 정보가 변경됐는지 확인할 방법이 없고, 이전 상태로 원복할 수 없다.
- 설정이 분산되어 어디에서 어떤 설정 정보를 변경해야 하는지 파악하기 어렵다.
- 손쉬운 암복호화 방법이 없다.
스프링 클라우드 설정 서버
스프링 클라우드 설정 서버가 제공하는 REST API 를 통해 설정 정보를 읽어 올 수 있다. 설정 서버는 설정 저장소와 클라이언트 사이에 위치하므로 둘 간의 보안기능을 추가 할 수 있다. 리프레시(Refresh) 라는 스코프를 이용해서 설정 서버를 재시작하지 않고도 변경 사항을 반영하게 할 수 있다.
서버 만들어 보기
프로젝트 생성
빈 Maven 프로젝트를 만든다.
의존성 설정
pom.xml 에 스프링부트와 스프링 클라우드의 설정서버 의존성을 넣는다.
<?xml version="1.0" encoding="UTF-8"?>
<project xmlns="http://maven.apache.org/POM/4.0.0"
         xmlns:xsi="http://www.w3.org/2001/XMLSchema-instance"
         xsi:schemaLocation="http://maven.apache.org/POM/4.0.0 http://maven.apache.org/xsd/maven-4.0.0.xsd">
    <modelVersion>4.0.0</modelVersion>

    <groupId>cothe</groupId>
    <artifactId>springConfigServer</artifactId>
    <version>1.0-SNAPSHOT</version>

    <dependencyManagement>
        <dependencies>
            <dependency>
                <groupId>org.springframework.cloud</groupId>
                <artifactId>spring-cloud-config</artifactId>
                <version>2.0.2.BUILD-SNAPSHOT</version>
                <type>pom</type>
                <scope>import</scope>
            </dependency>
        </dependencies>
    </dependencyManagement>
    <parent>
        <groupId>org.springframework.boot</groupId>
        <artifactId>spring-boot-starter-parent</artifactId>
        <version>2.0.4.RELEASE</version>
    </parent>
    <dependencies>
        <dependency>
            <groupId>org.springframework.boot</groupId>
            <artifactId>spring-boot-starter</artifactId>
        </dependency>
        <dependency>
            <groupId>org.springframework.cloud</groupId>
            <artifactId>spring-cloud-config-server</artifactId>
        </dependency>
    </dependencies>
    <repositories>
        <repository>
            <id>spring-snapshots</id>
            <name>Spring Snapshots</name>
            <url>https://repo.spring.io/libs-snapshot</url>
            <snapshots>
                <enabled>true</enabled>
            </snapshots>
        </repository>
    </repositories>
</project>
설정 리파지토리 지정
설정 서버에서 참조할 설정파일들이 존재하는 리파지토리를 지정한다. 설정 정보의 형상관리를 위해서 git, svn 저장소를 지정하는 것이 좋고 기본 가이드이다. git 저장소는 github 든 로컬 저장소는 상관없다. 여기서는 홈 디렉토리에 configServer 라는 디렉토리를 만들어서 로컬 저장소를 만든다.
디렉토리 만들기
$cd ~
$mkdir configServer
$git init
설정파일
application.yml
server:
  port: 8888
spring:
  cloud:
    config:
      server:
        git:
          uri: ${HOME}/configServer
서버의 포트는 기본에 사용하고 있는 포트가 아닌지 확인 후 지정한다.
설정 리파지토리에 설정파일 추가
설정 리파지토리에 설정정보를 담은 properties 파일을 추가한다. 예제에서는 프로젝트 이름을 설정 정보로 넣어봤다. 설정파일 이름은 {클라이언트이름}.properties 로 해야한다.
config-client.properties
configuration.projectName= Spring Boot Project
설정 파일을 추가한 뒤에 commit 을 해야한다.
git commit -am 'init'
스프링 부트 앱 만들기
스프링 부트로 실행 가능한 애플리케이션으로 만든다. @EnableConfigServer 는 이 스프링부트 앱이 설정 서버로 동작할 수 있게 한다.
ConfigServerApplication.java
package cothe;

@SpringBootApplication
@EnableConfigServer
public class ConfigServerApplication {
    public static void main(String[] args) {
        SpringApplication.run(ConfigServerApplication.class);
    }
}
서버 실행 후 테스트
서버를 실행하고 브라우저로 서버에 접속해 보자.
- 접속 URI : http://localhost:8888/config-client/master
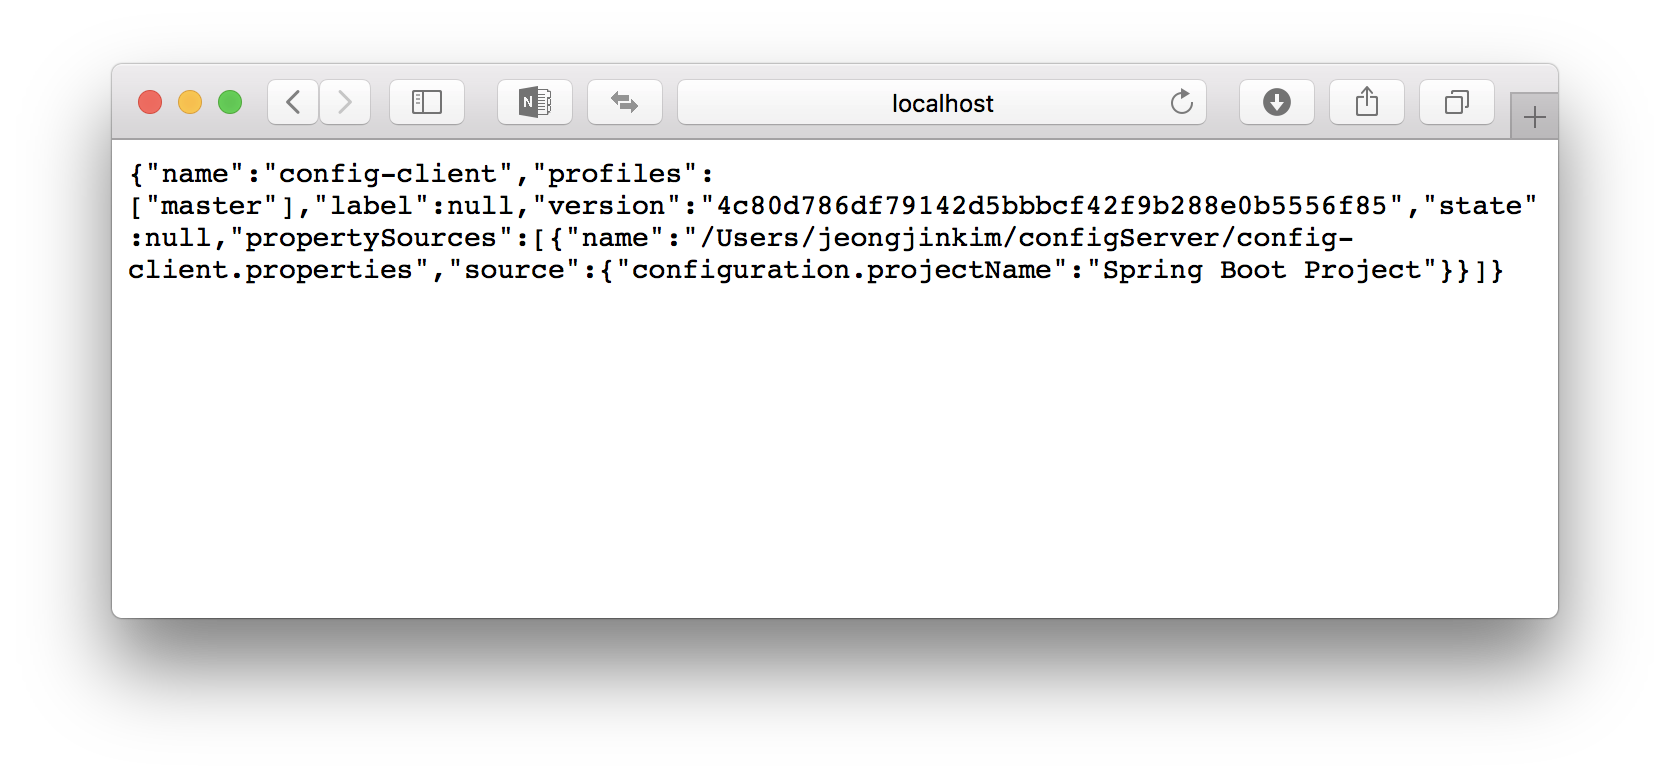 설정 정보가 올바르게 반환되는 것을 확인할 수 있다.
Subscribe via RSS