새로고침 가능한 설정 클라이언트 만들기-Cloud Native Java 따라하기 6
by Jeongjin Kim
한 서버에서 모든 설정 정보를 가지고 있고, 클라이언트는 그 서버에 접속하여 설정 정보를 가져오는 방식은 관리상 편리함을 준다.
설정 정보는 클라이언트가 빈을 초기화 할 때 그 정보를 가져온다. 만약 클라이언트가 동작하고 있는 중에 설정 정보가 바뀌게 되면 그 정보를 읽기 위하여 클라이언트를 다시 실행야하 하는 상황이 생길 수 있다.
이런 문제를 해결하기 위해서 스프링 클라우드에서는 @RefreshScope 애노테이션을 제공한다.
Refresh 이벤트를 받으면 그 범위에 있는 빈은 폐기되고 새로 생성되면서 변경된 설정 정보를 가져오는 방식이다.
이 포스트에서는 설정 정보를 제공하는 서버를 만들고, 리프레시 가능한 클라이언트를 만드는 방법을 소개한다.
개발 환경
- java 8
- Spring boot 2.0.4.RELEASE
설정 서버 만들기
의존성 설정
pom.xml
<?xml version="1.0" encoding="UTF-8"?>
<project xmlns="http://maven.apache.org/POM/4.0.0"
         xmlns:xsi="http://www.w3.org/2001/XMLSchema-instance"
         xsi:schemaLocation="http://maven.apache.org/POM/4.0.0 http://maven.apache.org/xsd/maven-4.0.0.xsd">
    <modelVersion>4.0.0</modelVersion>

    <groupId>cothe</groupId>
    <artifactId>springConfigServer</artifactId>
    <version>1.0-SNAPSHOT</version>

    <dependencyManagement>
        <dependencies>
            <dependency>
                <groupId>org.springframework.cloud</groupId>
                <artifactId>spring-cloud-config</artifactId>
                <version>2.0.2.BUILD-SNAPSHOT</version>
                <type>pom</type>
                <scope>import</scope>
            </dependency>
        </dependencies>
    </dependencyManagement>
    <parent>
        <groupId>org.springframework.boot</groupId>
        <artifactId>spring-boot-starter-parent</artifactId>
        <version>2.0.4.RELEASE</version>
    </parent>
    <dependencies>
        <dependency>
            <groupId>org.springframework.boot</groupId>
            <artifactId>spring-boot-starter</artifactId>
        </dependency>
        <dependency>
            <groupId>org.springframework.cloud</groupId>
            <artifactId>spring-cloud-config-server</artifactId>
        </dependency>
        <dependency>
            <groupId>org.springframework.boot</groupId>
            <artifactId>spring-boot-starter-security</artifactId>
        </dependency>
    </dependencies>
    <repositories>
        <repository>
            <id>spring-snapshots</id>
            <name>Spring Snapshots</name>
            <url>https://repo.spring.io/libs-snapshot</url>
            <snapshots>
                <enabled>true</enabled>
            </snapshots>
        </repository>
    </repositories>
</project>
SpringBootSpplication
@EnableConfigServer 로 설정하면 설정서버 기능을 한다.
ConfigServerApplication.java
@SpringBootApplication
@EnableConfigServer
public class ConfigServerApplication {
    public static void main(String[] args) {
        SpringApplication.run(ConfigServerApplication.class);
    }
}
애플리케이션 설정
설정 서버에서 참조할 설정파일들이 존재하는 리파지토리를 지정한다. 설정 정보의 형상관리를 위해서 git, svn 저장소를 지정하는 것이 좋고 기본 가이드이다. git 저장소는 github 든 로컬 저장소는 상관없다. 여기서는 홈 디렉토리에 configServer 라는 디렉토리를 만들어서 로컬 저장소를 만든다.
서버 포트는 8889로 지정했고, 보안 설정으로 user1 을 비밀번호 pass로 설정했다.
application.yml
server:
  port: 8889
spring:
  cloud:
    config:
      server:
        git:
          uri: ${HOME}/configServer
  security:
    user:
      name: user1
      password: pass
설정 파일 준비
configuration.projectName 에 Spring Boot Project 3 라는 값을 넣었다.
config-client.properties
configuration.projectName= Spring Boot Project 3
서버 실행
간단하게 이렇게 작성한 서버를 IDE에서 바로 실행시켰다.
클라이언트 만들기
의존성 설정
pom.xml
<?xml version="1.0" encoding="UTF-8"?>
<project xmlns="http://maven.apache.org/POM/4.0.0"
         xmlns:xsi="http://www.w3.org/2001/XMLSchema-instance"
         xsi:schemaLocation="http://maven.apache.org/POM/4.0.0 http://maven.apache.org/xsd/maven-4.0.0.xsd">
    <modelVersion>4.0.0</modelVersion>

    <groupId>cothe</groupId>
    <artifactId>springConfigClient</artifactId>
    <version>1.0-SNAPSHOT</version>
    <dependencyManagement>
        <dependencies>
            <dependency>
                <groupId>org.springframework.cloud</groupId>
                <artifactId>spring-cloud-config</artifactId>
                <version>2.0.2.BUILD-SNAPSHOT</version>
                <type>pom</type>
                <scope>import</scope>
            </dependency>
        </dependencies>
    </dependencyManagement>
    <dependencies>
        <dependency>
            <groupId>org.springframework.cloud</groupId>
            <artifactId>spring-cloud-starter-config</artifactId>
        </dependency>
        <dependency>
            <groupId>org.springframework.boot</groupId>
            <artifactId>spring-boot-starter-web</artifactId>
        </dependency>
        <dependency>
            <groupId>org.springframework.boot</groupId>
            <artifactId>spring-boot-starter-actuator</artifactId>
        </dependency>
    </dependencies><repositories>
    <repository>
        <id>spring-snapshots</id>
        <name>Spring Snapshots</name>
        <url>https://repo.spring.io/libs-snapshot</url>
        <snapshots>
            <enabled>true</enabled>
        </snapshots>
    </repository>
</repositories>

</project>
SpringBootApplication 만들기
별다른 설정 없이 간단하게 만든다.
ConfigClientApplication.java
@SpringBootApplication
public class ConfigClientApplication {
    public static void main(String[] args) {
        SpringApplication.run(ConfigClientApplication.class);
    }
}
설정 정보를 담는 서비스 만들기
서비스에 @RefreshScope 애노테이션를 붙였다. 이 범위에 있는 서비스 빈은 refresh 요청을 받게 되면 제거되고 다시 로드될 것이다.
ConfigCheckService.java
@Service
@RefreshScope
public class ConfigCheckService {
    private final String projectName;

    @Autowired
    public ConfigCheckService(@Value("${configuration.projectName}") String pn){
        this.projectName = pn;
    }

    public String getProjectName(){
        return this.projectName;
    }
}
Controller 만들기
웹 요청으로 현재 설정된 값을 확인하기 위해 RestController를 작성한다.
localhost:8080/project-name
으로 요청하면 서버에 설정된 값을 가져올 것이다.
ProjectNameRestController.java
@RestController
public class ProjectNameRestController {
    @Autowired
    ConfigCheckService configCheckService;

    @RequestMapping("/project-name")
    String projectName() {
        return configCheckService.getProjectName();
    }
}
애플리케이션 설정
설정 정보를 가지고 있는 서버 정보와 POST 로 refresh 받을 수 있도록 엔트포인트 설정을 한다.
bootstrap.yml
spring:
  application:
    name: config-client
  cloud:
    config:
      uri: http://user1:pass@localhost:8889
endpoints:
  actuator:
    enabled: true
management:
  endpoints:
    web:
      exposure:
        include: refresh
스프링 2.0 이상에서 refresh endpoint는 기본값으로 web 요청은 허용되지 않지만 활성화는 되어 있다. 따라서 별도로 노출을 시켜야 한다. endpoint가 활성화 된것과 노출된것은 의미가 다르다. 활성화 되었다는 것은 사용 가능하다는 의미하고 이를 사용하기 위한 인터페이스가 외부에 열려있냐 닫혀있냐가 노출 여부이다. 자세한 것은 Spring Docs Endpoints 문서를 참고하기 바란다.
테스트
클라이언트 실행 후 project-name 요청
클라이언트를 실행하고 post-man을 이용해서 현재 설정 값을 요청해본다.
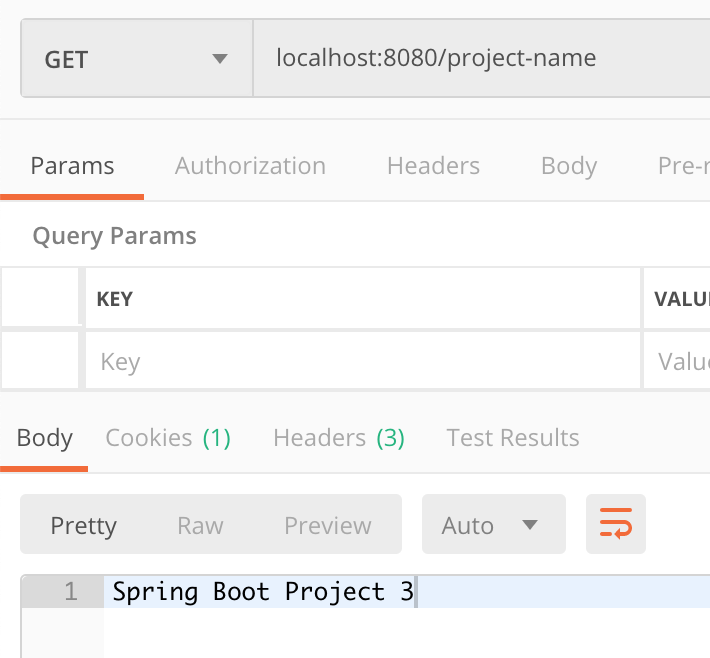 서버의 설정값인
Spring Boot Project 3
가 응답됨을 볼 수 있다.
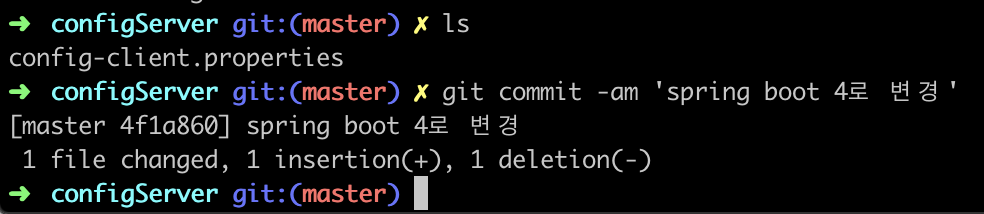
서버의 설정 값 변경
서버의 설정값을
Spring Boot Project 4

로 변경하고 commit 한다.
클라이언트에 refresh 신호 보내기
jmx를 이용해서 endpoint를 호출하는 것은 기본으로 노출이 되어있다. 하지만 http는 기본값으로 노출되어 있지 않은데 앞선 클라이언트 설정에서 refresh 를 사용 할 수 있도록 설정했다.
post-man 을 이용해서 POST 로 refresh 신호를 보내 보자
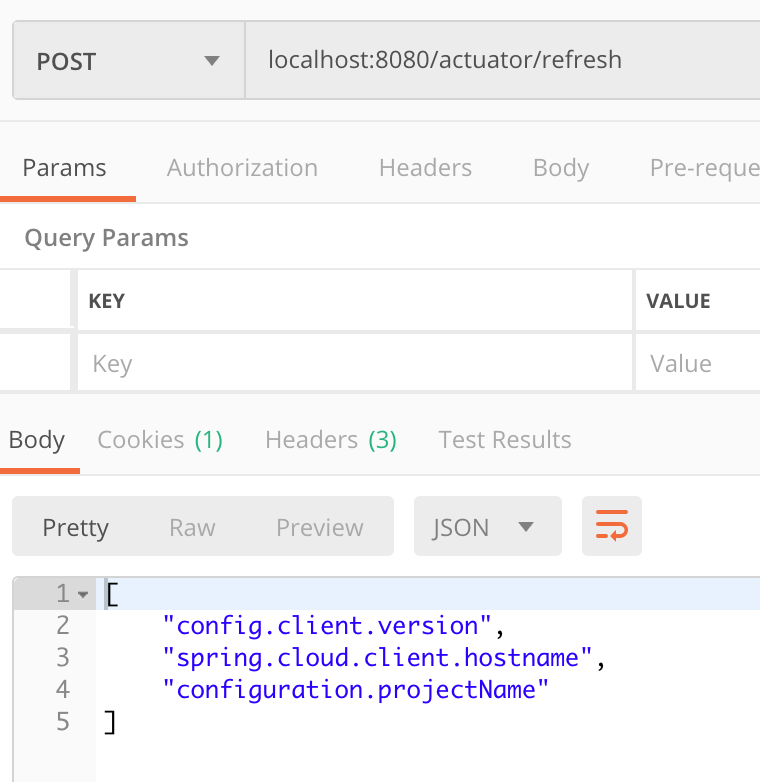
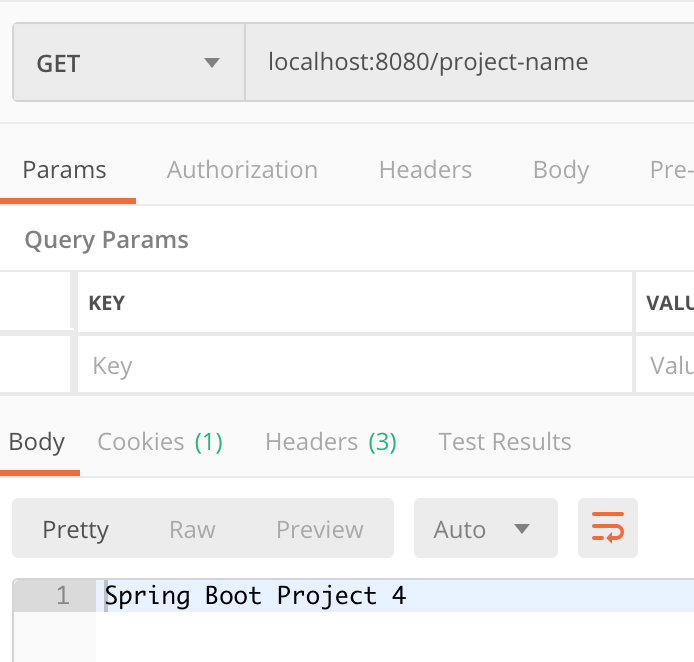
그리고 다시 서버 설정값을 확인해 보면 변경된 것을 볼 수 있다.
refresh 이벤트 활용
refresh 이벤트를 @EventListener 와 RefreshScopeRefreshedEvent 를 이용해서 잡아서 쓸 수 있다.
@Component
public class RefreshCounter {
    private final AtomicLong counter = new AtomicLong(0);

    @EventListener
    public void refresh(RefreshScopeRefreshedEvent e){
        // Do somthing.
    }
}
스프링 클라우드 버스
만약 클라언트가 많다면 모든 클라이언트에 대해서 전부 refresh 엔트포인트를 호출해야한다. 불편하기 짝이 없다. 이를 해결해 줄 수 있는 것이 스프링 클라우드 버스 이다.
자세한 사항은 스프링 버스 페이지를 확인해보자.
마무리
지금까지 간단한 설정 서버를 만들고 이를 사용하는 갱신 가능한 클라이언트를 만들어 봤다. 마이크로 서비스로 많은 서버들이 동작하는 환경이라면 이렇게 설정 서버를 이용해서 일괄 관리하는 것은 관리 효율을 매우 높여주므로 적극 사용하는 것이 좋을 것 같다. 하지만 설정 정보는 보안에 민감한 정보일 가능성이 높으므로 매우 주의해서 구축해야 함을 잊지 말아야 한다.
Subscribe via RSS