Spring Security Reference 따라하기 4
by Jeongjin Kim
지금까지
두서없이 레퍼런스에 있는 코드를 활용해서 로그인, 로그아웃 기능을 구현해봤다. 이쯤에서 레퍼런스에 주요한 내용을을 살펴보고 원래 만들고자 했던 권한관리시스템을 점차 구현하고자 한다. 레퍼런스를 필요한 부분을 추려서 번역했고 필요한 경우 javadoc의 원문을 포함했다. 또한 참조할 만한 코드를 필요한 지점에 적절히 삽입하였다.
기술 개요
핵심 콤포넌트
SecurityContextHolder, SecurityContext, Authentication Object
SecurityContextHolder는 Spring-security-core 에서 가장 중요한 오브젝트이다. 기본적으로 ThreadLocal 에 현재 애플리케이션의 사용자에 관한 것을 저장해 둔다. 그러나 어떤 애플리케이션은 모든 스레드 들에 관하여 똑같은 security context 를 유지해야 할 수 있다. 이 경우 SecurityContextHolder.MODE_GLOBAL 전략을 써서 전체를 공유하도록 할 수 있다.
javadoc Associates a given
SecurityContextwith the current execution thread. This class provides a series of static methods that delegate to an instance ofSecurityContextHolderStrategy. The purpose of the class is to provide a convenient way to specify the strategy that should be used for a given JVM. This is a JVM-wide setting, since everything in this class is static to facilitate ease of use in calling code.To specify which strategy should be used, you must provide a mode setting. A mode setting is one of the three valid
MODE_settings defined as static final fields, or a fully qualified classname to a concrete implementation ofSecurityContextHolderStrategythat provides a public no-argument constructor.There are two ways to specify the desired strategy mode String. The first is to specify it via the system property keyed on
SYSTEM_PROPERTY. The second is to callsetStrategyName(String)before using the class. If neither approach is used, the class will default to usingMODE_THREADLOCAL, which is backwards compatible, has fewer JVM incompatibilities and is appropriate on servers (whereas MODE_GLOBAL is definitely inappropriate for server use).
현재 사용자에 대한 정보 얻기
SecurityContextHolder는 현재 응용 프로그램과 상호 작용하는 사용자의 세부 정보를 가지고 있다. 이 정보를 Authentication 객체에 저장한다. 응용 프로그램의 모든 위치에서 다음 코드 블록을 사용하여 현재 인증 된 사용자의 이름을 얻을 수 있다.
Object principal = SecurityContextHolder.getContext().getAuthentication().getPrincipal();

if (principal instanceof UserDetails) {
  String username = ((UserDetails)principal).getUsername();
} else {
  String username = principal.toString();
}
UserDetailsService
Object principal = SecurityContextHolder.getContext().getAuthentication().getPrincipal();
이 코드에서 알 수 있는 것은 Authentication 오브젝트에서 사용자정보(principal)을 가져올 수 있다는 것이다. principal은 Object 타입인데 대부분은 UserDetails로 형변환하여 사용한다. UserDetails는 Spring-security에서 매우 중요한 interface이다. principal을 나타내면서 확장가능하고 애플리케이션에 특화되어 사용할 수 있다. UserDetails를 단순하게 생각하면, Spring security를 사용하기 위해 필요한 것들과 데이타베이스와의 어댑터라고 생각하면 된다.
사용자 DB 데이타를 표현하기 떄문에 애플리케이션에서 원래 제공한 비스니스 관련 메소드들(getEmail() 같은) 호출 할 수 있다.
그럼 UserDetails 를 어떻게 만드냐? 이를 위해 UserDetailsService가 있다.
public interface UserDetailsService {
  UserDetails loadUserByUsername(String username) throws UsernameNotFoundException;
}
UserDetailsService를 사용하는 것은 Spring Security 내에서 사용자에 대한 정보를 로드하는 가장 일반적인 접근법이며 사용자 정보가 필요할 때마다 프레임워크 전체에서 사용되는 것을 볼 수 있다.
인증에 성공하면 UserDetails는 SecurityContextHolder에 저장된 Authentication 객체를 만드는데 사용한다.
Spring-security에서 메모리 내 맵(InMemoryDaoImpl)을 사용하고 JDBC (JdbcDaoImpl)를 사용하는 것을 포함하여 여러 UserDetailsService 구현체를 제공한다.
그러나 대부분의 사용자는 개발자, 직원 또는 고객의 응용 프로그램 사용자를 나타내는 기존 DAO (Data Access Object)를 사용하여 직접 작성하는 경향이 있다.
UserDetailsService가 반환하는 모든 내용은 위 코드 조각을 사용하여 SecurityContextHolder에서 항상 얻을 수 있다는 이점이 있으니 사용하는 것을 권장한다.
UserDetailsService는 사용자 데이터를위한 완전한 DAO 이며 프레임워크 내에서 다른 구성 요소에 사용자 데이터를 제공하는 것 외의 다른 기능을 수행하지 않는다.
GrantedAuthority
Authentication 에서 getAuthorities() 메소드는 principal 을 제공하는 것과 마찬가지로 매우 중요하다. 이 메소드는 GrantedAuthority 오브젝트의 Array를 리턴한다. GrantedAuthority 는 말 그대로 사용자에게 부여된 권한이다. 권한은 보통 역할(role)로 표현하는데 가령 ROLE_ADMINISTRATOR, ROLE_HR_SUPERVISOR 같이 표현한다. GrantedAuthority 오브젝트는 보통 UserDetailsService 로 로드한다.
일반적으로 GrantedAuthority 개체는 애플리케이션 전반에 걸쳐 사용하는 권한이다. 특정 도메인 오브젝트에 국한되어 있지 않다는 의미이다.
다시 말해 Spring Security는 일반적인 상황을 처리하기 위해 설계되어있지 특정 사용자를 위한 GrantedAuthority 를 관리하지 않는다. 사용자별 권한 관리는 프로젝트의 도메인 객체 보안 기능을 사용해라.
정리
- SecurityContextHolder : SecurityContext에 대한 액세스를 제공
- SecurityContext : Authentication, 요청별 시큐리티 정보를 가짐
- Authentication : 사용자 정보
- GrantedAuthority : 사용자에게 보여된 애플리케이션 레벨의 권한
- UserDetails : DAO나 다른 보안 데이타로 부터 Authentication 을 만들기 위한 필수정보를 제공
- UserDetailsService : String style 사용자명으로 UserDetails 를 만듦
Authentication
Spring Security 에서 Authentication 란?
우리가 흔히하는 인증절차를 보면
- 사용자가 사용자명과 암호로 로그인을 시도
- 시스템은 암호가 정확한지 검증
- 사용자의 역할과 같은 정보를 얻음
- 사용자에 대한 시큐리티 컨텍스가 구성됨
- 사용자가 원하는 작업을 함
위 1,2,3 단계가 인증단계(Authentication)이다. 이걸 스프링시큐리티에서 어떻게 하는지 보자
- 사용자명과 암호로
UsernamePasswordAuthenticationToken(Authenticationinterface의 구현체) 인스턴스를 만듦 - 검증을 위해 Token을
AuthenticationManager의 인스턴스로 넘김 - 인증에 성공하면
AuthenticationManager는 완전한 정보로 채워진Authentication인스턴스를 반환함. - 반환된
Authentication를 파라미터로SecurityContextHolder.getContext().setAuthentication(…)를 호출해서 스프링 컨텍스트를 만듦
import org.springframework.security.authentication.*;
import org.springframework.security.core.*;
import org.springframework.security.core.authority.SimpleGrantedAuthority;
import org.springframework.security.core.context.SecurityContextHolder;

import java.io.BufferedReader;
import java.io.InputStreamReader;
import java.util.ArrayList;
import java.util.List;

public class AuthenticationExample {
    private static AuthenticationManager am = new SampleAuthenticationManager();

    public static void main(String[] args) throws Exception {
        BufferedReader in = new BufferedReader(new InputStreamReader(System.in));

        while (true) {
            System.out.println("Please enter your username:");
            String name = in.readLine();
            System.out.println("Please enter your password:");
            String password = in.readLine();
            try {
                Authentication request = new UsernamePasswordAuthenticationToken(name, password);
                Authentication result = am.authenticate(request);
                SecurityContextHolder.getContext().setAuthentication(result);
                break;
            } catch (AuthenticationException e) {
                System.out.println("Authentication failed: " + e.getMessage());
            }
        }
        System.out.println("Successfully authenticated. Security context contains: " +
                SecurityContextHolder.getContext().getAuthentication());
    }
}

class SampleAuthenticationManager implements AuthenticationManager {
    static final List<GrantedAuthority> AUTHORITIES = new ArrayList<GrantedAuthority>();

    static {
        AUTHORITIES.add(new SimpleGrantedAuthority("ROLE_USER"));
    }

    public Authentication authenticate(Authentication auth) throws AuthenticationException {
        if (auth.getName().equals(auth.getCredentials())) {
            return new UsernamePasswordAuthenticationToken(auth.getName(),
                    auth.getCredentials(), AUTHORITIES);
        }
        throw new BadCredentialsException("Bad Credentials");
    }
}
SecurityContextHolder 내용을 직접 설정하기
사실, Spring Security는 Authentication 객체를 SecurityContextHolder에 어떻게 두는 지 신경 쓰지 않는다. 다만 SecurityContextHolder는 AbstractSecurityInterceptor가 작업을 인가하기 전에 사용자 정보를 나타내는 Authentication을 가지고 있어야 한다는 것이다.
우리는 보통 Spring Security를 기반으로하지 않는 인증 시스템과의 상호 운용성을 제공하기 위해 직접 필터 또는 MVC 컨트롤러를 작성한다. 기존 인증 시스템과 Spring-security를 연결하는 방법은 간단히 필터를 만들면 된다. 기존 시스템에서 사용자 정보를 읽어들여서 Authentication 객체를 만들고 이걸 SecurityContextHolder에 넣어주기하면 하면 된다.
이 경우 내장 된 인증 인프라에 의해 자동으로 처리되는 사항에 대해서도 생각해 봐야한다.
요청간 컨텍스트를 캐시하기 위해서 response를 만들기 전에 HTTP session을 미리 만들어야 할 수 도 있다.
Web Application에서 인증
일반적인 웹 애플리케이션 인증 절차
- 홈페이지에서 링크를 누름
- 요청은 서버로가고 서버에서 보호하고 있는 지원인지 아닌지 결정함
- 미리 인증되어 있지 않다면 서버는 인증해야 한다고 알려줄 것임. HTTP 응답코드를 주던지 아니면 특정 웹 페이지로 넘김
- 인증 메커니즘에 따라서 브라우저가 로그인을 할 수 있도록 페이지를 이동하거나 기본 인증 대화상자나 쿠키, X.509 인증서 등을 통해 사용자의 id를 검색한다.
- 브라우저는 서버로 인증정보를 다시 보낸다. 사용자가 폼에 작성한 내용을 HTTP POST로 보내거나 HTTP header에 인증 정보를 포함하여 보낸다.
- 서버는 전달받은 인증정보가 유효한지 검증한다. 유효하지 않다면 보통 다시 인증정보를 물어본다.
- 원래 요청은 다시 서버로 전달 된다. 이제 요청한 자원에 대해 접근 권한이 있으면 요청에 대한 응답을 받을 것이고 권한이 없으면 HTTP 403(forbidden) 에러 코드를 받을 것이다.
스프링 시큐리티에는 위에서 설명한 대부분의 단계를 담당하는 별개의 클래스가 있다.
ExceptionTranslationFilter, AuthenticationEntryPoint 및 “인증 메커니즘”이며, 이전 섹션에서 보았던 AuthenticationManager를 호출한다.
ExceptionTranslationFilter
ExceptionTranslationFilter는 Spring Security에서 발생하는 예외를 감지하는 필터이다. 예외는 일반적으로 인증 서비스의 주요 공급자인 AbstractSecurityInterceptor에 의해 발생한다. AbstractSecurityInterceptor는 일반적인 Java Exception 을 발생시키고 예외가 왜 발생했는지는 알지 못 한다. 그래서 ExceptionTranslationFilter가 발생한 예외를 해석해서 웹 애플리케이션에서 유효한 에러로 변경한다. 예를 들면 403 에러를 던지거나(인증 절차에 7번째에 대항) AuthenticationEntryPoint를 실행시킨다. (인증 절차에 3번째에 해당함)
AuthenticationEntryPoint
AuthenticationEntryPoint는 위의 목록에서 3단계를 담당한다. 웹 애플리케이션은 기본 인증 전략을 가진다. 주요 인증 시스템에는 고유한 AuthenticationEntryPoint 구현이 있으며, 일반적으로 3단계에서 설명한 작업 중 하나를 수행한다.
Authentication Mechanism
브라우저가 인증 정보 (HTTP 양식 또는 HTTP 헤더)를 제출하면 서버에서 이러한 인증 정보를 수집하는 것이 필요하다. Spring Security에는 사용자 에이전트 (보통 웹 브라우저)에서 인증 세부 정보를 수집하는 기능에 대한 특별한 이름이 있는데 이를 인증 메커니즘이라고 한다. 예를들어 양식 기반 로그인과 기본 인증이 있다. 인증 세부 사항이 사용자 에이전트로부터 수집되면 Authentication 요청 객체가 생성되고 AuthenticationManager에 제출된다.
/**
* Processes an Authentication request.
*/
public interface AuthenticationManager {
  /**
  Attempts to authenticate the passed Authentication object, returning a fully populated Authentication object (including granted authorities) if successful.
  An AuthenticationManager must honour the following contract concerning exceptions:
  A DisabledException must be thrown if an account is disabled and the AuthenticationManager can test for this state.
  A LockedException must be thrown if an account is locked and the AuthenticationManager can test for account locking.
  A BadCredentialsException must be thrown if incorrect credentials are presented. Whilst the above exceptions are optional, an AuthenticationManager must always test credentials.
  Exceptions should be tested for and if applicable thrown in the order expressed above (i.e. if an account is disabled or locked, the authentication request is immediately rejected and the credentials testing process is not performed). This prevents credentials being tested against disabled or locked accounts.

  Params:
  authentication – the authentication request object
  Returns:
  a fully authenticated object including credentials
  Throws:
  AuthenticationException – if authentication fails
  */
  Authentication authenticate(Authentication authentication){
    throws AuthenticationException;
  }
}
인증 메커니즘이 완전히 채워진 Authentication 객체를 수신하면 요청은 유효하다고 간주하고 Authentication을 SecurityContextHolder에 넣고 원래 요청을 재시도한다.(위의 7 단계).
반면에 AuthenticationManager가 요청을 거절하면 인증 메커니즘은 사용자 에이전트에 재시도를 요청한다(위의 2 단계).
요청간 SecurityContext 저장
응용 프로그램 유형에 따라 사용자 작업간에 보안 컨텍스트를 저장하는 전략이 필요할 수도 있다. 일반적인 웹 응용 프로그램에서 사용자가 한 번 로그인 하면 그 다음부터는 세션 ID로 식별한다. 서버는 세션 지속기간 동안 사용자 정보를 캐시한다. Spring Security에서는 SecurityContextPersistenceFilter가 요청 사이에서 SecurityContext를 저장한다. SecurityContextPersistenceFilter는 기본적으로 컨텍스트를 HttpSession Attribute로 저장한다. 각 요청에 대한 컨텍스트를 SecurityContextHolder로 가져오고 요청이 완료되면 SecurityContextHolder를 지운다. 보안을 위해 HttpSession에 직접 접근해서 데이터를 핸들링 하면 안된다.
많은 다른 유형의 응용 프로그램 (예 : 상태 비 저장 RESTful 웹 서비스)은 HTTP 세션을 사용하지 않고 모든 요청에 대해 다시 인증한다.
그러나 각 요청 후에 SecurityContextHolder가 지워지도록 SecurityContextPersistenceFilter가 체인에 포함되는 것이 중요하다.
단일 세션에서 동시에 요청을 받는 응용 프로그램에서 동일한
SecurityContext인스턴스가 스레드간에 공유된다.ThreadLocal를 사용하고 있지만 각 스레드에서는HttpSession에서 인스턴스를 가져오기 때문에 동일한 인스턴스를 반환한다. 만약에 한 스레드에서 임시로 컨텍스트를 바꾸기를 원하는 경우 주의해야 한다.SecurityContextHolder.getContext()로 컨텍스트를 가져오고setAuthentication(anAuthentication)을 호출하면 같은SecurityContext인스턴스를 사용하고 있는 모든 현재 스레드에 있는 정보까지 다 같이 바뀌게 된다.SecurityContextPersistenceFilter를 커스터마이징하면 요청 마다 완전히 새로운SecurityContext를 반환하게 할 수 있다. 이 방법으로 한 스레드에서 생긴 변경이 다른 스레드로 전파되지 않도록 할 수 있다. 또 다른 방법은SecurityContextHolder.createEmptyContext()메서드를 호출하여 임시적으로 컨텍스트를 만들 수도 있다.
스프링 시큐리티의 접근제어(Authorization)
Spring Security에서 액세스 제어 결정을 담당하는 주요 인터페이스는 AccessDecisionManager이다.
/**
Makes a final access control (authorization) decision.
*/
public interface AccessDecisionManager {
  /**
  Resolves an access control decision for the passed parameters.

  Params:
  authentication – the caller invoking the method (not null)
  object – the secured object being called
  configAttributes – the configuration attributes associated with the secured object being invoked
  Throws:
  AccessDeniedException – if access is denied as the authentication does not hold a required authority or ACL privilege
  InsufficientAuthenticationException – if access is denied as the authentication does not provide a sufficient level of trust
  */
  void decide(Authentication authentication, Object object,
      Collection<ConfigAttribute> configAttributes) throws AccessDeniedException,
      InsufficientAuthenticationException;
  /**
  Indicates whether this AccessDecisionManager is able to process authorization requests presented with the passed ConfigAttribute.
  This allows the AbstractSecurityInterceptor to check every configuration attribute can be consumed by the configured AccessDecisionManager and/or RunAsManager and/or AfterInvocationManager.

  Params:
  attribute – a configuration attribute that has been configured against the AbstractSecurityInterceptor
  Returns:
  true if this AccessDecisionManager can support the passed configuration attribute
  */
  boolean supports(ConfigAttribute attribute);

  /**
  Indicates whether the AccessDecisionManager implementation is able to provide access control decisions for the indicated secured object type.

  Params:
  clazz – the class that is being queried
  Returns:
  true if the implementation can process the indicated class
  */
  boolean supports(Class<?> clazz);
}
AccessDecisionManager 인터페이스에는 AccessDecisionManager 접근을 요청한 주체를 나타내는 Authentication 객체, 접근하고자 하는 보안객체, 그 객체가 가진 Security metadata 속성 리스트(예를들어 엑세스에 필요한 역할 목록 등)를 사용하여 접근 가능 여부를 판단하는 메소드(decide)가 있다.
void decide(Authentication authentication, Object object,
    Collection<ConfigAttribute> configAttributes) throws AccessDeniedException,
    InsufficientAuthenticationException;
Security와 AOP Advice
AOP에 익숙하다면 before, after, throws, around 등과 같은 다양한 유형의 advice 가 있다는 것을 알고 있을 것이다. around advice 는 쓸모가 많은데 advisor 가 메소드 호출을 실행 할지 말지, 응답을 변경 할지 말지, 예외를 발생시킬지 말지를 결정할 수 있기 때문이다. 스프링 시큐리티(Spring Security)는 웹 요청뿐만 아니라 메소드 호출에 대한 around advice 를 제공한다. Spring Security는 Spring 표준 AOP 지원을 사용하여 메소드 호출에 대한 around advice 를 구현했고, 표준 필터를 사용하여 웹 요청에 대한 around advice 를 구현하고 있다.
Spring Security가 메소드 요청과 웹 요청을 보호할 수 있다는 사실을 이해 해야한다. 대부분의 개발자는 서비스 계층에서 메소드 호출 보안에 관심이 있다. 왜냐하면 서비스 계층에 Java EE 애플리케이션의 비즈니스 로직이 대부분 있기 때문이다. 서비스 계층에서 메소드 호출보안만 고려한다면 Spring의 표준 AOP로 구현이 가능하다. 하지만 도메인 객체를 직접 보호해야한다면, AspectJ를 활용해야 할 수 있다.
AspectJ 또는 Spring AOP를 사용하여 메소드 권한 부여를 수행하거나 필터를 사용하여 웹 요청 권한 부여를 수행하도록 선택할 수 있다.
Secure Objects와 AbstractSecurityInterceptor
Secure Object는 보안 적용이 필요한 모든 것을 의미한다. 예를 들면 웹 호출 과 메소드 호출 이 있다.
지원되는 각각의 보안 오브젝트 유형은 AbstractSecurityInterceptor의 서브 클래스인 자체 인터셉터 클래스가 있다. 중요한 것은 AbstractSecurityInterceptor가 호출되기 전까지 Principal이 인증되면 SecurityContextHolder에 인증된 Authentication이 포함된다는 것이다.
AbstractSecurityInterceptor는 보안 객체 요청을 처리하기위한 일관된 워크 플로우를 제공한다.
- 현재 요청과 연관된 configuration attributes 을 찾는다.
- Secure object, 현재 Authentication 및 configuration attributes을
AccessDecisionManager에 제출하여 권한 결정을 내림 - 필요하면 호출이 일어난
Authentication를 변경 - Secure object 호출 할 수 있도록 허가함(접근권한이 있을 때)
- 호출이 반환되면
AfterInvocationManager를 호출합니다 (설정된 경우). 호출에서 예외가 발생하면AfterInvocationManager가 호출되지 않음.
Configuration Attributes?
AbstractSecurityInterceptor가 사용하는 클래스에게 특별한 의미를 주는 문자열이다. 이 문자열은 프레임워크 내의 ConfigAttribute 인터페이스로 제공된다. AccessDecisionManager 구현이 얼마나 정교한 지에 따라 단순한 역할 이름이거나 더 복잡한 의미를 가질 수 있다. AbstractSecurityInterceptor는 보안 객체의 속성을 찾기 위해 사용하는 SecurityMetadataSource로 구성된다. 일반적으로 이 구성은 사용자에게 표시되지 않는다. 구성 속성은 보안 방법에 대한 annotation 또는 보안 URL에 대한 액세스 속성으로 입력된다.
예를 들면
<intercept-url pattern='/secure/**' access='ROLE_A,ROLE_B'/>
이는 구성 속성 ROLE_A 및 ROLE_B가 주어진 패턴과 일치하는 웹 요청에 적용된다는 의미이다.
실제로 기본 AccessDecisionManager 구성을 사용하면이 두 속성 중 하나와 일치하는 GrantedAuthority를 가진 사용자는 액세스가 허용된다.
엄밀히 말하면, 이것은 속성 일 뿐이며 해석은 AccessDecisionManager 구현에 의존한다.
접두어 ROLE_은 이러한 속성이 역할이고 Spring Security의 RoleVoter에 가 사용한다는 의미이다.
이것은 voter-based 인 AccessDecisionManager를 사용할 때만 의미가 있다.
RunAsManager
AccessDecisionManager가 요청을 허용하기로 결정했다면, AbstractSecurityInterceptor는 일반적으로 요청 처리를 진행한다. 하지만 이것을 SecurityContext내부에 있는 Authentication을 RunAsManager를 호출하는 AccessDecisionManager가 관리하는 Authentication으로 대체하고자 할 수 있다.
이 기능은 어떤 서비스 레이어의 메소드가 원격 시스템을 호출하려고 하는데 다른 사용자로 바꿔서 호출해야 하는 경우에 매우 유용하다.
Spring Security는 한 서버에서 다른 서버로 보안 신원을 자동으로 전파하기 때문에 (적절하게 구성된 RMI 또는 HttpInvoker 원격 프로토콜 클라이언트를 사용한다고 가정 할 때) 유용 할 수 있다.
AfterInvocationManager
AbstractSecurityInterceptor는 보안 객체가 호출되고 리턴된 뒤 -메소드 호출 완료 또는 필터 체인 진행을 의미 할 수 있음- 는 호출을 처리 할 마지막 지점이 있다. 이 단계에서 AbstractSecurityInterceptor는 반환된 객체를 수정하는데 관심이 있다. 보안 객체 호출에 대한 승인이 나지 않았을 때 이런 상황을 만들 수 있다. AbstractSecurityInterceptor는 AfterInvocationManager에 컨트롤을 전달하여 필요할 경우 실제로 객체를 수정할 수 있다. 이 클래스는 객체를 완전히 바꾸거나, 예외를 던지거나, 변경하지 않을 수 있다. after-invocation은 호출이 성공한 경우에만 실행된다. 예외가 발생하면 추가 검사를 건너 뛴다.
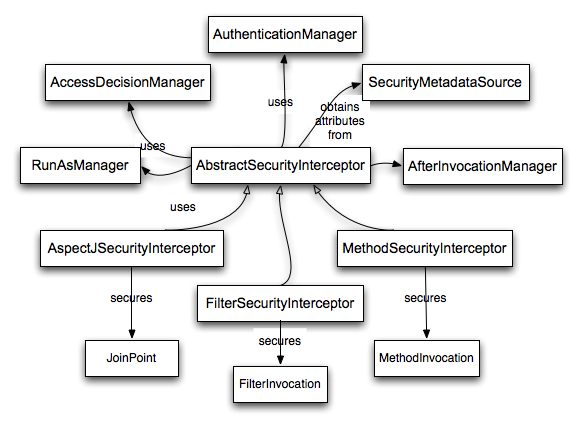
보안 객체 모델 확장
요청을 가로채고 권한을 부여하는 완전히 새로운 방법을 고민하는 개발자만 보안 객체를 직접 사용해야한다. 예를 들어 메시징 시스템에 대한 호출을 보호하기 위해 새 보안 개체를 만들 수 있다. 보안이 필요하고 (AOP 관련 advice 시맨틱과 같이) 호출을 가로채는 방법을 제공하는 것은 보안 객체로 만들어 질 수 있다. 이미 언급했듯이, 대부분의 Spring 애플리케이션은 완전한 투명성으로 현재 지원되는 세 가지 보안 객체 유형 (AOP Alliance MethodInvocation, AspectJ JoinPoint 및 웹 요청 FilterInvocation)을 단순히 사용한다.
Core Services
AuthenticationManager, ProviderManager, AuthenticationProvider
Spring Security의 기본 구현체는 ProviderManager이다. ProviderManager는 인증 요청을 직접 처리하지 않고 구성된 AuthenticationProvider 리스트에 위임한다. ProviderManager는 리스트에 있는 AuthenticationProvider가 인증을 수행 할 수 있는지를 차례로 돌면서 인증을 시도한다.
/**
  Indicates a class can process a specific Authentication implementation.
*/
public interface AuthenticationProvider {
  /**
  Performs authentication with the same contract as AuthenticationManager.authenticate(Authentication) .

  Params:
  authentication – the authentication request object.
  Returns:
  a fully authenticated object including credentials. May return null if the AuthenticationProvider is unable to support authentication of the passed Authentication object. In such a case, the next AuthenticationProvider that supports the presented Authentication class will be tried.
  Throws:
  AuthenticationException – if authentication fails.
  */
  Authentication authenticate(Authentication authentication)
    throws AuthenticationException;

  /**
  Returns true if this AuthenticationProvider supports the indicated Authentication object.
  Returning true does not guarantee an AuthenticationProvider will be able to authenticate the presented instance of the Authentication class. It simply indicates it can support closer evaluation of it. An AuthenticationProvider can still return null from the authenticate(Authentication) method to indicate another AuthenticationProvider should be tried.
  Selection of an AuthenticationProvider capable of performing authentication is conducted at runtime the ProviderManager.

  Params: authentication
  Returns: true if the implementation can more closely evaluate the Authentication class presented
   */
  boolean supports(Class<?> authentication);
}
AuthenticationProvider는 예외를 던지던지, 완전하게 채워진 Authentication 오브젝트를 리턴한다. 인증 요청을 확인하는 가장 일반적인 방법은 해당 UserDetails를 로드하고 로드된 비밀번호를 사용자가 입력 한 비밀번호와 비교하여 확인하는 것이다. 이것은 DaoAuthenticationProvider에서 사용하는 접근 방식이다. 로드 된 UserDetails 객체 (특히 포함된 GrantedAuthority)는 성공적인 인증에서 반환되고 SecurityContext에 저장되는 완전히 채워진 Authentication 객체를 작성할 때 사용된다.
네임 스페이스를 사용하는 경우 내부적으로 ProviderManager의 인스턴스가 만들어지고 유지관리되며, namespace에 authentication provider elements를 사용하여 Provider를 추가한다.(네임 스페이스 장 참조). 이 경우 Application context에 ProviderManager bean을 선언하면 안된다. 그러나 네임스페이스를 사용하지 않으면 다음과 같이 선언 할 수 있다.
<bean id="authenticationManager"
    class="org.springframework.security.authentication.ProviderManager">
  <constructor-arg>
    <list>
      <ref local="daoAuthenticationProvider"/>
      <ref local="anonymousAuthenticationProvider"/>
      <ref local="ldapAuthenticationProvider"/>
    </list>
  </constructor-arg>
</bean>
위의 예에서는 세 개의 공급자가 있다. List 순서로 인증을 시도한다. null이 리턴되면 인증을 스킵한다. 모든 구현이 null를 리턴하면 ProviderManager는 ProviderNotFoundException을 던진다.
web form-login processing filter 같은 인증 메커니즘은 ProviderManager에 대한 참조와 함께 주입되며 인증 요청을 처리하기 위해 이를 호출한다. Provider는 때로는 인증 메커니즘과 상호 교환 가능할 수 있으며, 다른 경우에는 특정 인증 메커니즘에 의존한다. 예를 들어 DaoAuthenticationProvider 및 LdapAuthenticationProvider는 간단한 사용자 이름 / 암호 인증 요청을 제출하는 모든 메커니즘과 호환되므로 양식 기반 로그인 또는 HTTP 기본 인증과 함께 작동한다.
반면에 일부 인증 메커니즘은 단일 유형의 AuthenticationProvider에서만 해석 할 수있는 인증 요청 객체를 만든다. 예를 들어 JA-SIG CAS는 서비스 티켓 개념을 사용하므로 CasAuthenticationProvider에서만 인증 할 수 있다.
적절한 공급자를 등록하는 것을 잊어 버리면 인증을 시도 할 때 ProviderNotFoundException을 받게 되므로이 점에 너무 신경 쓰지 않아도 된다.
성공적인 인증시 인증서 지우기
기본적으로 (Spring Security 3.1부터) ProviderManager는 성공적인 인증 요청에 의해 반환 된 Authentication 객체로부터 민감한 자격 증명 정보를 제거하려고 시도한다. 이렇게하면 암호가 필요 이상으로 오래 유지되는 것과 같은 일이 차단된다.
그러나 이는 stateless 응용 프로그램의 성능을 향상시키기 위해 사용자 개체의 캐시를 사용하는 경우 문제가 발생할 수 있다. 인증에 캐시 (예 : UserDetails 인스턴스)에 대한 개체에 대한 참조가 포함되어 있고 자격 증명이 제거 된 경우 캐시 된 값에 대해 더 이상 인증 할 수 없다. 캐시를 사용하는 경우 이를 고려해야한다. 분명한 해결책은 캐시 구현 또는 반환 된 Authentication 객체를 만드는 AuthenticationProvider에서 객체의 복사본을 만드는 것이다. 또는 ProviderManager에서 eraseCredentialsAfterAuthentication 속성을 비활성화 할 수 있다.
DaoAuthenticationProvider
Spring Security에 의해 구현 된 가장 간단한 AuthenticationProvider는 DaoAuthenticationProvider이다. DaoAuthenticationProvider는 또한 프레임워크에서 지원되는 가장 초기의 것 중 하나이다. 사용자 이름, 암호 및 GrantedAuthority를 찾기 위해 UserDetailsService(DAO)를 활용한다.
UsernamePasswordAuthenticationToken에 제출된 암호와 UserDetailsService에 의해 로드된 암호를 비교하여 사용자를 인증한다. provider 구성은 매우 간단하다.
<bean id="daoAuthenticationProvider"
	class="org.springframework.security.authentication.dao.DaoAuthenticationProvider">
<property name="userDetailsService" ref="inMemoryDaoImpl"/>
<property name="passwordEncoder" ref="passwordEncoder"/>
</bean>
PasswordEncoder는 옵션이다. PasswordEncoder는 구성된 UserDetailsService에서 리턴된 UserDetails 오브젝트에 표시된 암호의 인코딩 및 디코딩을 제공한다.
UserDetailsService 구현
이 참조 가이드 앞부분에서 언급했듯이 대부분의 Authentication provider는 UserDetails 및 UserDetailsService 인터페이스를 이용한다. UserDetailsService는 메소드 하나만 가지고 있다.
UserDetails loadUserByUsername(String username) throws UsernameNotFoundException;
반환 된 UserDetails는 사용자 이름, 암호, 부여 된 권한 및 사용자 계정의 활성화 또는 비활성화와 같은 인증 정보의 null이 아닌 프로비저닝을 보장하는 getter를 제공하는 인터페이스이다.
/**
Provides core user information.
Implementations are not used directly by Spring Security for security purposes. They simply store user information which is later encapsulated into Authentication objects. This allows non-security related user information (such as email addresses, telephone numbers etc) to be stored in a convenient location.
Concrete implementations must take particular care to ensure the non-null contract detailed for each method is enforced. See User for a reference implementation (which you might like to extend or use in your code).
See Also:
UserDetailsService, UserCache
 */
public interface UserDetails extends Serializable {
	/**
  Returns the authorities granted to the user. Cannot return null.

  Returns:
  the authorities, sorted by natural key (never null)
	 */
  Collection<? extends GrantedAuthority> getAuthorities();

	/**
  Returns the password used to authenticate the user.

  Returns:
  the password
	 */
  String getPassword();

	/**
  Returns the username used to authenticate the user. Cannot return null.

  Returns:
  the username (never null)
	 */
  String getUsername();

	/**
  Indicates whether the user's account has expired. An expired account cannot be authenticated.

  Returns:
  true if the user's account is valid (ie non-expired), false if no longer valid (ie expired)
	 */
  boolean isAccountNonExpired();

	/**
  Indicates whether the user is locked or unlocked. A locked user cannot be authenticated.

  Returns:
  true if the user is not locked, false otherwise
	 */
  boolean isAccountNonLocked();

	/**
  Indicates whether the user's credentials (password) has expired. Expired credentials prevent authentication.

  Returns:
  true if the user's credentials are valid (ie non-expired), false if no longer valid (ie expired)
	 */
  boolean isCredentialsNonExpired();

	/**
  Indicates whether the user is enabled or disabled. A disabled user cannot be authenticated.

  Returns:
  true if the user is enabled, false otherwise
	 */
  boolean isEnabled();
}
대부분의 인증 공급자는 사용자 이름과 암호가 인증 결정의 일부로 실제로 사용되지 않더라도 UserDetailsService를 사용한다. 이들 공급자는 GrantedAuthority 정보만 사용한다. LDAP 또는 X.509 또는 CAS 등의 다른 시스템이 실제로 자격 증명의 유효성을 검사해야하기 때문이다.
UserDetailsService가 구현하기가 쉽기 때문에 사용자가 원하는 지속성 전략을 사용하여 인증 정보를 쉽게 가져올 수 있어야 한다. 그렇지만 Spring Security에는 몇 가지 유용한 기본 구현이 포함되어 있다.
In-Memory 인증
응용프로그램 중 UserDetailsService를 구현하기 위해서 복잡한 요구사항이 없는 것도 있다. 특히, 데이터베이스 구성이나 UserDetailsService 구현을 작성하는데 시간을 허비하고 싶지 않을 때, 프로토타입 애플리케이션을 구축하거나 Spring Security 통합을 시작하는 경우에 특히 그렇다. 이러한 상황에서 간단한 해결 방법은 user-service 요소를 사용하는 것이다.
<user-service id="userDetailsService">
<!-- Password is prefixed with {noop} to indicate to DelegatingPasswordEncoder that
NoOpPasswordEncoder should be used. This is not safe for production, but makes reading
in samples easier. Normally passwords should be hashed using BCrypt -->
<user name="jimi" password="{noop}jimispassword" authorities="ROLE_USER, ROLE_ADMIN" />
<user name="bob" password="{noop}bobspassword" authorities="ROLE_USER" />
</user-service>
이것은 또한 외부 property 사용을 지원한다.
<user-service id="userDetailsService" properties="users.properties"/>
프로퍼티 파일은 양식의 항목을 포함해야한다.
username=password,grantedAuthority[,grantedAuthority][,enabled|disabled]
예를 들어
jimi=jimispassword,ROLE_USER,ROLE_ADMIN,enabled
bob=bobspassword,ROLE_USER,enabled
JdbcDaoImpl
또한 Spring Security에는 JDBC 데이터 소스로부터 인증 정보를 얻을 수있는 UserDetailsService가 있다. 내부적으로 Spring JDBC를 사용하고 있어 user details를 저장하기 위해서 fully-featured ORM을 사용하는 복잡성을 피할 수 있다. 응용 프로그램에서 ORM 도구를 사용하는 경우 사용자 지정 UserDetailsService를 작성하여 이미 작성한 매핑 파일을 다시 사용할 수 있다.
<bean id="dataSource" class="org.springframework.jdbc.datasource.DriverManagerDataSource">
  <property name="driverClassName" value="org.hsqldb.jdbcDriver"/>
  <property name="url" value="jdbc:hsqldb:hsql://localhost:9001"/>
  <property name="username" value="sa"/>
  <property name="password" value=""/>
</bean>

<bean id="userDetailsService"
	class="org.springframework.security.core.userdetails.jdbc.JdbcDaoImpl">
  <property name="dataSource" ref="dataSource"/>
</bean>
위에 표시된 DriverManagerDataSource를 수정하여 다른 관계형 데이터베이스 관리 시스템을 사용할 수 있다. 다른 Spring 설정과 마찬가지로 JNDI에서 가져온 전역 데이터 소스를 사용할 수도 있다.
Authority Groups
기본적으로 JdbcDaoImpl은 권한이 사용자에게 직접 맵핑된다고 가정하고 단일 사용자에 대한 권한을 로드한다 (데이터베이스 스키마 부록 참조). 또 다른 접근법은 권한을 그룹으로 분할하고 사용자에게 그룹을 지정하는 것이다. 어떤 사람들은 이 접근 방식을 사용자 권한을 관리하는 수단으로 선호한다.
Javadoc Group Support Support for group-based authorities can be enabled by setting the enableGroups property to true (you may also then wish to set enableAuthorities to false to disable loading of authorities directly). With this approach, authorities are allocated to groups and a user’s authorities are determined based on the groups they are a member of. The net result is the same (a UserDetails containing a set of GrantedAuthoritys is loaded), but the different persistence strategy may be more suitable for the administration of some applications.
When groups are being used, the tables “groups”, “group_members” and “group_authorities” are used. See DEF_GROUP_AUTHORITIES_BY_USERNAME_QUERY for the default query which is used to load the group authorities. Again you can customize this by setting the groupAuthoritiesByUsernameQuery property, but the format of the rows returned should match the default.
Password Encoding
스프링 시큐리티의 PasswordEncoder 인터페이스는 패스워드를 단방향으로 변환하여 패스워드를 안전하게 저장할 수 있게 해준다. PasswordEncoder는 편도 변환이며, 암호 변환이 양방향 (즉, 데이터베이스 인증에 사용되는 자격 증명 저장) 일 필요가 있는 경우에는 제공되지 않는다. 일반적으로 PasswordEncoder는 인증시 사용자가 제공한 암호와 비교해야하는 암호를 저장하는 데 사용된다.
Password history
수년 동안 암호 저장을위한 표준 메커니즘이 발전했다. 처음에는 암호가 일반 텍스트로 저장되었다. 데이터 저장소에 액세스 하기 위해서는 필요한 자격증명이 필요했기 때문에 그 곳에 저장하는 것이 안전하다고 생각했다. 그러나 악의적인 사용자는 SQL Injection과 같은 공격을 사용하여 사용자 이름과 암호를 얻어 낼 수 있었다. 점점 더 많은 사용자 자격 증명이 노출되면서 보안 전문가들은 사용자 패스워드를 더 견고하게 막아야 한다고 인식했다.
개발자는 SHA-256과 같은 일방향 해시를 통해 암호를 저장 한 후 암호를 저장하도록 권장되었다. 사용자가 인증을 시도하면 해시된 비밀번호는 입력한 비밀번호의 해시와 비교한다. 즉, 시스템은 암호의 단방향 해시를 저장하기만 하면된다. 공격을 당해서 암호가 노출되어도 암호의 단방향 해시만 노출되었다. 해시는 단방향 인코딩이라 해시를 복호화 하는 것은 계산적으로 매우 어렵기 떄문에 일일히 추측해보는 것은 의미가 없었다. 이 새로운 시스템을 무력화시키기위해 악의적인 사용자는 레인보우 테이블이라는 조회 테이블을 만들었다. 매번 암호를 추측하는 대신 암호를 한 번 계산하여 조회 테이블에 저장했다.
Rainbow Tables의 효과를 줄이기 위해 개발자는 salted 암호를 사용하는 것이 좋다. 암호만 해시 함수의 임력으로 쓰는 것이 아니라 모든 사용자에게 생선된 임의의 바이트를 더해서 해시값을 만들어 낸다. salt는 일반 텍스트로 사용자 패스워드와 함께 저장한다. 그리고 사용자가 인증을 시도하면 데이타베이스에 저장된 해시된 암호와 사용자가 입력한 암호 그리고 데이타베이스에 저장된 salt를 합친 값을 해시를 비교한다. 이렇게 하면 Rainbow Tables은 더이상 의미가 없어진다.
현대에서는 암호화 해시 (예 : SHA-256)가 더 이상 안전하지 않다. 현대 하드웨어는 초당 수십억번의 해시 계산을 수행 할 수 있기 때문이다. 즉, 각 비밀번호를 개별적으로 쉽게 해독 할 수 있다.
이제 개발자는 적응형 단방향 함수를 활용하여 암호를 저장하는 것이 좋다. 적응형 단방향 기능을 가진 암호 검증은 의도적으로 리소스(즉, CPU, 메모리 등)를 집중적으로 사용한다. 적응형 단방향 기능은 하드웨어 성능이 향상됨에 따라 증가시킬 수 있는 할 수 있는 work factor 를 설정 할 수 있다. 시스템에서 암호를 확인하는 데 work factor 가 약 1 초가 걸릴 수 있도록 조정하는 것이 좋다. 트레이드 오프 (trade off)가 있는데 공격자가 암호를 해독하기 어렵게 만들지만 시스템에 과도한 부담을 준다. 시스템마다 성능이 크게 다를 것이므로 사용자는 자신의 시스템에 대한 work factor 를 사용자 정의하는 것이 좋다. 적응형 단방향 함수의 예로는 bcrypt, PBKDF2, scrypt 및 Argon2가 있다.
적응형 단방향 함수는 의도적으로 리소스를 많이 사용하기 때문에 모든 요청에 대해 사용자 이름과 암호의 유효성을 검사하면 응용 프로그램의 성능이 크게 저하된다. Spring Security 또는 다른 라이브러리도 패스워드 검증을 빠르게 하는 방법이 없다. 그래서 장기 신임 정보 (예 : 사용자 이름 및 비밀번호)를 단기 신임 정보 (예 : 세션, OAuth 토큰 등)로 교환하는 것을 권장한다. 단기 자격 증명은 보안상 손실없이 신속하게 검증될 수 있다.
DelegatingPasswordEncoder
Spring Security 5.0 이전에는 기본 PasswordEncoder 가 일반 텍스트 암호를 지원하는 NoOpPasswordEncoder 였다. 위에서 본 Password History에 의하면 현재의 디폴트 인코더가 BCryptPasswordEncoder와 같은 것일 거라고 생각할 수 있다. 그러나 그러기에는 현실적인 3가지 문제가 있다.
- 쉽게 이전 할 수 없는 이전 암호 인코딩을 사용하는 많은 응용 프로그램이 있다.
- 암호 저장에 대한 모범 사례가 다시 변경된다.
- Spring Security는 프레임워크로써 자주 변경이 일어나면 안된다.
대신 Spring Security는 DelegatingPasswordEncoder를 도입하여 모든 문제를 다음과 같이 해결했다 :
- 현재 비밀번호 저장 권장 사항을 사용하여 비밀번호가 인코딩되는지 확인한다.
- 현대 및 기존 형식의 암호 유효성 검사 허용
- 향후 인코딩 업그레이드 허용
PasswordEncoderFactories를 사용하여 DelegatingPasswordEncoder의 인스턴스를 쉽게 생성 할 수 있다.
PasswordEncoder passwordEncoder =
    PasswordEncoderFactories.createDelegatingPasswordEncoder();
또는 사용자 지정 인스턴스를 직접 만들 수도 있다. 예 :
String idForEncode = "bcrypt";
Map encoders = new HashMap<>();
encoders.put(idForEncode, new BCryptPasswordEncoder());
encoders.put("noop", NoOpPasswordEncoder.getInstance());
encoders.put("pbkdf2", new Pbkdf2PasswordEncoder());
encoders.put("scrypt", new SCryptPasswordEncoder());
encoders.put("sha256", new StandardPasswordEncoder());

PasswordEncoder passwordEncoder =
    new DelegatingPasswordEncoder(idForEncode, encoders);
Password Storage Format
암호의 일반적인 형식은 다음과 같다.
{id}encodedPassword
id는 어떤 PasswordEncoder가 사용되어야 하는지를 찾는데 사용되는 식별자이고 encodedPassword는 선택된 PasswordEncoder의 원래 인코딩 된 암호이다. ID는 비밀번호 시작 부분에 있어야하며 { 로 시작하고 }로 끝나야한다. id를 찾을 수 없으면 id는 null이 된다. 예를 들어, 다음은 다른 ID를 사용하여 인코딩된 비밀번호 목록이다. 모든 원래 암호는 “password”이다.
{bcrypt}$2a$10$dXJ3SW6G7P50lGmMkkmwe.20cQQubK3.HZWzG3YB1tlRy.fqvM/BG
{noop}password
{pbkdf2}5d923b44a6d129f3ddf3e3c8d29412723dcbde72445e8ef6bf3b508fbf17fa4ed4d6b99ca763d8dc
{scrypt}$e0801$8bWJaSu2IKSn9Z9kM+TPXfOc/9bdYSrN1oD9qfVThWEwdRTnO7re7Ei+fUZRJ68k9lTyuTeUp4of4g24hHnazw==$OAOec05+bXxvuu/1qZ6NUR+xQYvYv7BeL1QxwRpY5Pc=
{sha256}97cde38028ad898ebc02e690819fa220e88c62e0699403e94fff291cfffaf8410849f27605abcbc0
Password Encoding
생성자에 전달된 idForEncode는 비밀번호를 인코딩하는데 사용할 PasswordEncoder를 결정한다. 위에서 작성한 DelegatingPasswordEncoder에서 암호를 인코딩한 결과는 BCryptPasswordEncoder에 위임되고 접두사는 {bcrypt}임을 의미한다.
Password Matching
match는 {id}와 생성자에서 제공되는 PasswordEncoder에 대한 id의 매핑을 기반으로 수행된다. matches(CharSequence, String)를 패스워드와 매핑되지 않은 ID (null i도 포함)를 넣어서 호출했을 경우에 결과적으로 IllegalArgumentException가 발생한다. DelegatingPasswordEncoder.setDefaultPasswordEncoderForMatches (PasswordEncoder)를 사용하여 인코더를 사용자 정의 할 수 있다.
id를 사용하여 어떤 패스워드 인코딩이라도 매치 시킬 수 있다. 하지만 패드워드 인코딩은 가장 최신의 패스워드 인코딩 방법을 쓰는 것이 좋다. 이게 중요한 이유는 암호화와 다르게 패스워드 해시들은 일반 텍스트로 복구 할 수 없게 단방향으로 설계되어 있기 때문에 이관을 하기 매우 힘들어 진다.
BCryptPasswordEncoder
BCryptPasswordEncoder 구현은 널리 지원되는 bcrypt 알고리즘을 사용하여 암호를 해싱한다. 패스워드 크래킹에 대한 저항성을 높이기 위해 bcrypt 는 의도적으로 느리게 동작한다. 다른 적응형 단방향 기능과 마찬가지로 시스템의 암호를 확인하는 데 약 1 초가 걸릴 수 있도록 조정해야한다.
// Create an encoder with strength 16
BCryptPasswordEncoder encoder = new BCryptPasswordEncoder(16);
String result = encoder.encode("myPassword");
assertTrue(encoder.matches("myPassword", result));
The Security Filter Chain
Spring Security의 웹 인프라는 표준 서블릿 필터 기반이다. 서블릿이나 다른 서블릿 기반 프레임워크 (예 : Spring MVC)를 내부적으로 사용하지 않으므로 특정 웹 기술에 대한 의존관계가 없다. HttpServletRequest와 HttpServletResponse를 다루고 있으며 요청이 브라우저, 웹 서비스 클라이언트, HttpInvoker 또는 AJAX 응용 프로그램에서 온 것인지 여부는 중요하지 않다.
스프링 시큐리티는 내부적으로 필터 체인을 유지한다. 각 필터들은 고유의 역할을 가지고 있고, 서비스들이 어떤 요구사항이 있는지에 따라 필터를 추가하거나 삭제할 수 있다. 필터의 순서는 필터 사이에 의존성이 있으므로 중요하다. 네임스페이스 구성을 사용하고 있다면 필터가 자동으로 구성되며 스프링 빈을 명시 적으로 정의 할 필요는 없다. 하지만 네임스페이스에서 지원하지 안흔 기능을 쓰거나, 커스터마이징된 버전을 사용해서 Security Filter Chain을 전체적으로 제어하고 싶을 때는 빈으로 등록하면 된다.
DelegatingFilterProxy
서블릿 필터를 사용할 때는 web.xml 에 명시적으로 선언해야한다. 그렇지않으면 서블릿 컨테이너에서 무시된다. Spring Security에서 필터 클래스는 애플리케이션 컨텍스트에 정의 된 스프링 빈 이기도하므로 Spring의 풍부한 의존성 주입 기능과 라이프 사이클 인터페이스를 이용할 수 있다. Spring의 DelegatingFilterProxy는 _web.xml_과 애플리케이션 컨텍스트 사이의 링크 를 제공한다.
DelegatingFilterProxy를 사용할 때 web.xml 파일에 다음과 같이 정의힌다.
<filter>
  <filter-name>myFilter</filter-name>
  <filter-class>org.springframework.web.filter.DelegatingFilterProxy</filter-class>
</filter>

<filter-mapping>
  <filter-name>myFilter</filter-name>
  <url-pattern>/*</url-pattern>
</filter-mapping>
필터는 실제로는 DelegatingFilterProxy이며 실제로 필터 논리를 구현한 클래스는 아니다. DelegatingFilterProxy가 하는 일은 Filter 메소드를 Spring Application Context에서 얻은 Bean에 위임하는 것이다. 이를 통해 빈은 Spring 웹 애플리케이션 컨텍스트 라이프 사이클 지원 및 구성 유연성의 이점을 누릴 수 있다. 빈은 javax.servlet.Filter를 구현해야하며 filter-name 요소의 이름과 동일한 이름을 가져야 한다. 자세한 정보는 DelegatingFilterProxy에 대한 Javadoc을 읽으십시오.
javadoc Proxy for a standard Servlet Filter, delegating to a Spring-managed bean that implements the Filter interface. Supports a “targetBeanName” filter init-param in web.xml, specifying the name of the target bean in the Spring application context. web.xml will usually contain a DelegatingFilterProxy definition, with the specified filter-name corresponding to a bean name in Spring’s root application context. All calls to the filter proxy will then be delegated to that bean in the Spring context, which is required to implement the standard Servlet Filter interface. This approach is particularly useful for Filter implementation with complex setup needs, allowing to apply the full Spring bean definition machinery to Filter instances. Alternatively, consider standard Filter setup in combination with looking up service beans from the Spring root application context. NOTE: The lifecycle methods defined by the Servlet Filter interface will by default not be delegated to the target bean, relying on the Spring application context to manage the lifecycle of that bean. Specifying the “targetFilterLifecycle” filter init-param as “true” will enforce invocation of the Filter.init and Filter.destroy lifecycle methods on the target bean, letting the servlet container manage the filter lifecycle. As of Spring 3.1, DelegatingFilterProxy has been updated to optionally accept constructor parameters when using Servlet 3.0’s instance-based filter registration methods, usually in conjunction with Spring 3.1’s org.springframework.web.WebApplicationInitializer SPI. These constructors allow for providing the delegate Filter bean directly, or providing the application context and bean name to fetch, avoiding the need to look up the application context from the ServletContext. This class was originally inspired by Spring Security’s FilterToBeanProxy class, written by Ben Alex. Since: 1.2 See Also: setTargetBeanName, setTargetFilterLifecycle, Filter.doFilter, Filter.init, Filter.destroy, DelegatingFilterProxy(Filter), DelegatingFilterProxy(String), DelegatingFilterProxy(String, WebApplicationContext), javax.servlet.ServletContext.addFilter(String, Filter), org.springframework.web.WebApplicationInitializer
FilterChainProxy
스프링 시큐리티의 웹 인프라는 FilterChainProxy 인스턴스에 위임해야만 사용할 수 있다. 보안 필터는 자체적으로 사용하면 안된다. 이론적으로는 application context 파일에 필요한 각 Spring Security 필터 빈을 선언하고 해당 DelegatingFilterProxy 항목을 web.xml 에 각 필터에 추가하고, 순서가 바르게 되었는지 확인하면 된다. 하지만 필터가 많은 경우 번거롭고 web.xml 파일을 복잡하게 만든다. FilterChainProxy를 사용하면 web.xml 에 한개 엔트리만 추가하면 되고 application context 파일 하나로 전체 웹 시큐리티 빈들을 관리할 수 있다. 위의 예와 같이 DelegatingFilterProxy를 사용하지만 filter-name을 bean 이름 filterChainProxy로 설정하여 연결한다. 그런면 필터 채인이 같은 빈 이름으로 application context 파일 내에 선언된다.
<bean id="filterChainProxy" class="org.springframework.security.web.FilterChainProxy">
  <constructor-arg>
    <list>
      <sec:filter-chain pattern="/restful/**" filters="
        securityContextPersistenceFilterWithASCFalse,
        basicAuthenticationFilter,
        exceptionTranslationFilter,
        filterSecurityInterceptor" />
      <sec:filter-chain pattern="/**" filters="
        securityContextPersistenceFilterWithASCTrue,
        formLoginFilter,
        exceptionTranslationFilter,
        filterSecurityInterceptor" />
    </list>
  </constructor-arg>
</bean>
네임스페이스 요소인 filter-chain은 응용 프로그램 내에서 필요한 보안 필터 체인을 설정하기위해 사용한다. 특정 URL 패턴을 filters 요소에 지정된 bean 이름으로 빌드 된 필터 목록에 맵핑하고 이를 SecurityFilterChain 유형의 bean에 결합한다. pattern 속성은 Ant Paths를 취하며 가장 구체적인 URI가 먼저 표시 되어야한다. 런타임시 FilterChainProxy는 현재 웹 요청과 일치하는 첫 번째 URI 패턴을 찾고 filters 속성으로 지정된 필터 빈의 목록이 해당 요청에 적용된다. 필터는 정의된 순서대로 호출되므로 특정 URL에 적용되는 필터 체인을 완벽하게 제어 할 수 있다.
필터 체인에서 두 개의 SecurityContextPersistenceFilter를 선언했음을 눈치 챘을 것이다. (ASC는 allowSessionCreation의 약자로, SecurityContextPersistenceFilter의 속성 임). 웹 서비스는 앞으로의 요청에서 절대로 jsessionid를 제공하지 않으므로 그러한 사용자 에이전트에 대해 HttpSession을 만드는 것은 낭비 일 것이다. 최대한의 확장성을 필요로하는 대용량 애플리케이션을 사용하는 경우 위의 방법을 사용하는 것이 좋다. 소규모 응용 프로그램의 경우 단일 SecurityContextPersistenceFilter (기본 allowSessionCreation를 true로 설정)를 사용하면 충분하다.
FilterChainProxy는 구성된 필터에서 표준 필터 수명주기 메서드를 호출하지 않는다. 다른 Spring 빈처럼 다른 방법으로 Spring의 애플리케이션 컨텍스트 라이프 사이클 인터페이스를 사용하는 것이 좋다.
네임스페이스 구성을 사용하여 웹 보안을 설정하는 방법을 살펴볼 때 DelegatingFilterProxy를 springSecurityFilterChain이라는 이름으로 사용했다. 이제 네임스페이스에서 만든 FilterChainProxy의 이름임을 알 수 있다.
연관된 포스트
Spring-Security Reference 따라하기 1
Spring-Security Reference 따라하기 2
Spring-Security Reference 따라하기 3
Subscribe via RSS